DI Injection with Dagger 2 - Hello World Example for Android
September 29, 2017
In this tutorial, we will create a simplest Dagger 2 - Hello World Example for Android using Android Studio.
Git Hub Project
The complete project can be cloned from here
Prerequisites
- Please make sure Java and Android Studio IDE are installed on your system.
Reference
Create An Android Application
We will create a new Android application. So from Android Studio, choose File -> New -> New Project. Fill in with your prefer Application name and so on. Then choose Empty Application when you are asked for Add an Activity to Mobile. Finally, we just use the default name for MainActivity at Configure Activity Dialog. Then click Finish.
Add Dependencies
Add these following lines to build.gradle(Module:app) and click Sync Now at the top right corner.
    compile 'com.google.dagger:dagger:2.11'
    annotationProcessor 'com.google.dagger:dagger-compiler:2.11'
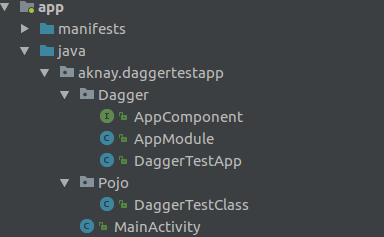
Create Packages, Classes and Interface
Now, we will just create empty classes and interface, just want to explain how these are arranged in Dagger 2.
- First, create a package called
Dagger - Under
Daggerpackage, addAppModuleclass - Under
Daggerpackage, addAppComponentinterface -
Under
Daggerpackage, addDaggerTestAppclass - First, create a package called
Pojo - Under
Pojopackage, addDaggerTestClassclass
Finally, the directory should look like this
Understanding How They Link Together
Real World Example
Fragments
Objects) A --> C B --> C D --> E C --> F E --> F F --> G G --> H style A fill:#27ae60 ,stroke:#333; style B fill:#27ae60 ,stroke:#333; style D fill:#27ae60 ,stroke:#333; style C fill:#8ed861 ,stroke:#333; style E fill:#8ed861 ,stroke:#333; style F fill:#7070ff ,stroke:#333; style G fill:#2e4f70 ,stroke:#333; style H fill:#ee5133 ,stroke:#333;
In Our Example
From the above diagram, the DaggerTestClass is the one that we want to inject. Therefore, the DaggerTestClass will be instantiated in AppModule. Then AppModule will be added to AppComponent to define which module to use and where to inject them. Remember, there can be multiple modules to load and multiple places to inject (MainActivity, Fragments…), just like in real world example. Once we lay out how the injection will be done, we use DaggerTestApp to build and generate code for us. After code generation is done, we can inject them in our MainActivity. That’s our plan.
Start Coding Our Plan
DaggerTestClass.java
This is just plain POJO class. This will be injected to our MainActivity.
1
2
3
4
5
6
7

package aknay.daggertestapp.Pojo;

public class DaggerTestClass {
    public String getString(String s) {
        return "Hello " + s;
    }
}
AppModule.java
You can identify the Module class by annotation @Module. In this class, we use @Provides to provide DaggerTestClass instance. The @Singleton is used here so that there will only one instance of DaggerTestClass.
1
2
3
4
5
6
7
8
9
10
11
12
13
14
15
16
17
18
19
20
21
22
23

package aknay.daggertestapp.Dagger;

import android.app.Application;
import javax.inject.Singleton;
import aknay.daggertestapp.Pojo.DaggerTestClass;
import dagger.Module;
import dagger.Provides;

@Module
public class AppModule {

    Application mApplication;

    public AppModule(Application application) {
        mApplication = application;
    }

    @Provides
    @Singleton
    DaggerTestClass provideDaggerTestClass() {
        return new DaggerTestClass();
    }
}
AppComponent.java
You might notice that we use @Component annotation to load AppModule.class. You can add multiple modules here. In this interface, we use inject for the injection at MainActivity. You can also inject it to your Fragments.
1
2
3
4
5
6
7
8
9
10
11

package aknay.daggertestapp.Dagger;

import javax.inject.Singleton;
import aknay.daggertestapp.MainActivity;
import dagger.Component;

@Singleton
@Component(modules = {AppModule.class})
public interface AppComponent {
    void inject(MainActivity activity);
}
DaggerTestApp.java
This is the final part before we start injection. This is also the part for Dagger code generation of our setup. In line 13, we use DaggerAppComponent to build. This is the only naming you need to follow. Because we name our application component as AppComponent, we need to use Dagger + AppComponent to build. Once you write that into Android Studio, the IDE will show you as an error as the DaggerAppComponent is not recognized. That’s because Dagger hasn’t generated the code for us yet. Therefore, we generate the code by Build -> Make Project from the main menu. After that, everything will be green except appModule is deprecated. It’s just a warning and it will be gone after we start using that component in our MainActivity.
1
2
3
4
5
6
7
8
9
10
11
12
13
14
15
16
17
18
19
20
21

package aknay.daggertestapp.Dagger;

import android.app.Application;

public class DaggerTestApp extends Application {
    private AppComponent mAppComponent;

    @Override
    public void onCreate() {
        super.onCreate();

        //Must Follow Dagger<Your App Component Name>
        mAppComponent = DaggerAppComponent.builder()
                .appModule(new AppModule(this))
                .build();
    }

    public AppComponent getAppComponent() {
        return mAppComponent;
    }
}
AndroidManifest.xml
Before we do the injection, we need to declare DaggerTestApp as Application. Otherwise, it won’t be instantiated.
Add the following line to AndroidManifest.xml after the <application tag.
android:name=".Dagger.DaggerTestApp"
MainActivity.java
In this MainActivity, we will finally inject our DaggerTestClass using @Inject annotation. After that, we use DaggerTestApp application and perform the injection in our MainActivity. Then we just use the mDaggerTestClass instance to print out using Logger.
1
2
3
4
5
6
7
8
9
10
11
12
13
14
15
16
17
18
19

package aknay.daggertestapp;

import android.support.v7.app.AppCompatActivity;
import android.os.Bundle;
import android.util.Log;
import javax.inject.Inject;
import aknay.daggertestapp.Dagger.DaggerTestApp;
import aknay.daggertestapp.Pojo.DaggerTestClass;

public class MainActivity extends AppCompatActivity {
    @Inject DaggerTestClass mDaggerTestClass;
    @Override
    protected void onCreate(Bundle savedInstanceState) {
        super.onCreate(savedInstanceState);
        ((DaggerTestApp) getApplication()).getAppComponent().inject(this);
        setContentView(R.layout.activity_main);
        Log.d("MainActivity", mDaggerTestClass.getString("Dagger 2"));
    }
}
Result
You should see this in log screen.
Hello Dagger 2