How to run Apache Spark Cluster on Raspberry Pi
June 05, 2018
In this tutorial, we will run a cluster containing one master (Ubuntu PC) and two workers (2 Raspberry Pis). Then we will create a cluster to run a job with workers.
Prerequisites
- One PC and two Raspberry Pi (can be Pi 2/3)
- A hub or router to connect all the machines together
Reference
Overview
In this tutorial, we will have one cluster (one master and two workers). All three machines are running on a local network. We will install Apache Spark on every machine. Once the Apache Spark is installed, we start master and slaves by running shells. After that, we will write a self-contained application and send a job to workers. Then, we will verify the output.
Network Setup
We have one master (IP Address: 192.168.6.163) and two Raspberry Pi (IP Address: 192.168.6.147 and 192.168.6.174) as shown in the diagram below. You network IP address maybe different.
Apache Spark Installation
Please follow this guide to install Apache Spark Installation on every machine (one master and two workers).
Starting Apache Spark Cluster
I installed all Apache Spark directory under my home/my_user_name. Your Apache Spark directory may be different.
At Master
We go to sbin under Apache Spark directory and run start-master.sh with our master IP address which is 192.168.6.163. So we can run the master like the following.
$ cd ~/spark-2.3.0-bin-hadoop2.7/sbin/
$ ./start-master.sh -h ./start-master.sh -h 192.168.6.163
At Workers
Similarly, We go to sbin under Apache Spark directory and run start-slave.sh. But this time, we need use Spark Master address which is spark://<your_master_ip_address>:7077.
Therefore, you should run the start-slave shell from every workers (Raspberry Pi) with Spark Master Address like the following.
$ cd ~/spark-2.3.0-bin-hadoop2.7/sbin/
$ ./start-slave.sh spark://192.168.6.163:7077
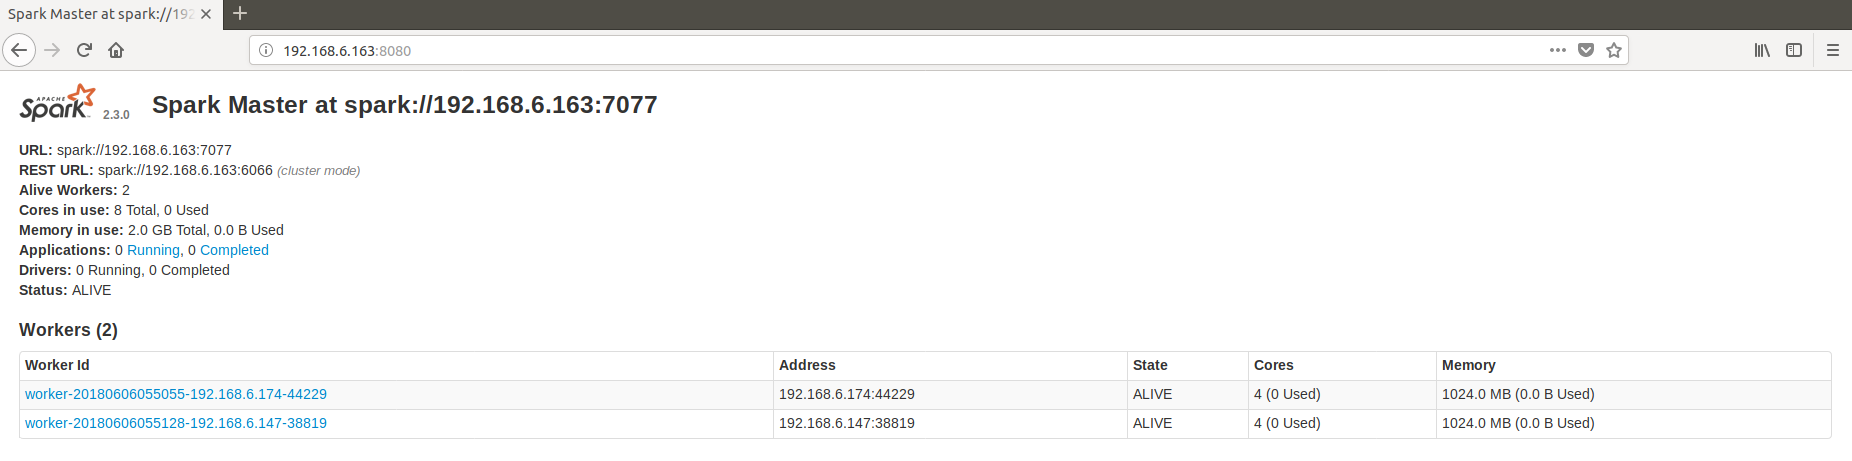
After you run the start-slave shell from every worker, you should verify whether all the workers are running correctly. You can do this by accessing web at http://<master_ip_address>:8080. So in our case, we can access on the web browser by typing http://192.168.6.163:8080 and you should see something like this in the browser.
Note: If either master or slaves are not running correctly, you can troubleshoot by looking at the log file with this command
$ less ~/spark-2.3.0-bin-hadoop2.7/logs/<your_log_file_name>. Basically, it is under <SPARK_HOME_DIR/logs>
Install SBT at Master
We will be sending a job from Master. So we need to use SBT to compile as an application. Please follow my tutorial post here to install SBT at master machine.
Setup project at Master
Once the SBT is installed, we will use hello world template to set up our application.
So run at your home directory
$ cd ~/
$ sbt new scala/hello-world.g8
Once the console has appeared, just type in spark or any name you wish as the project name. This console will be shown like the following.
name [Hello World template]: spark

Template applied in ./spark
Now we will be editing the build.sbt file for the dependencies.
Go to the project folder. in our case, spark folder.
$ cd ~/spark
$ nano build.sbt
Remove any text from inside build.sbt and replace with the following text.
name := "SimpleApp"

version := "1.0"

scalaVersion := "2.11.8"

libraryDependencies += "org.apache.spark" %% "spark-sql" % "2.3.0"
Go to the source folder and edit Main.scala.
$ cd ~/spark/src/main/scala
$ nano Main.scala
Then paste the following the lines into the Main.scala and save it.
1
2
3
4
5
6
7
8
9
10
11
12
13
14
import org.apache.spark.sql.SparkSession

import scala.io.Source

object Main {
  def main(args: Array[String]) {
    val spark = SparkSession.builder.appName("Simple Application").getOrCreate()
    val filename = args(0)
    val iterator = Source.fromFile(filename).getLines.toSeq
    val numOfSpark = iterator.count(l => l.contains("spark"))
    println(s"Number of spark : $numOfSpark")
    spark.stop()
  }
}
After that, go back to the main project folder and build the package
$ cd ~/spark
$ sbt package
Once the packing is done, take note of the jar generated file name. For our case,
Packaging /home/aknay/spark/target/scala-2.11/simpleapp_2.11-1.0.jar ...
Copy the README.md file from spark-2.3.0-bin-hadoop2.7 to our spark project folder. You can also do like this.
$ cp ~/spark-2.3.0-bin-hadoop2.7/README.md ~/spark
Finally,
we can just submit the job by
$ ~/spark-2.3.0-bin-hadoop2.7/bin/spark-submit --class "Main" --master spark://192.168.6.163:7077 --files README.md target/scala-2.11/simpleapp_2.11-1.0.jar README.md
Note: Please look at this and this to understand the all the arguments that we just use.
You will see a lot of text but take note of the output result from our main class Main.scala.
...
Number of spark : 13
...
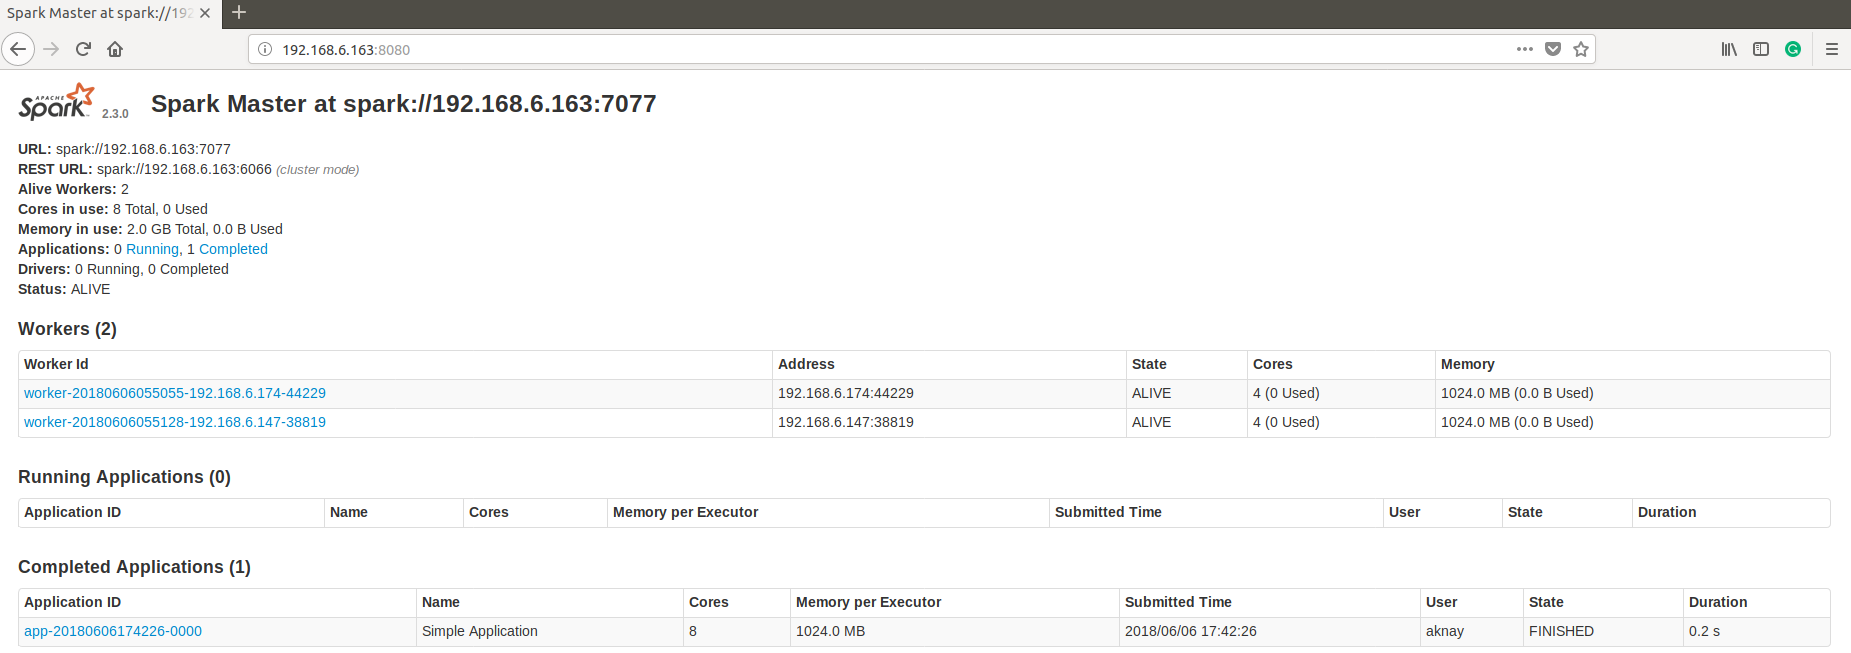
You can also see from the browser whether the job is successfully completed or not. Like the following.
Explaination
I would like to explain a little about Main.scala file. We are using README.md file which is located at the master machine (under our project folder) but it does not exist in worker file systems. So we pass the file by using --files tag when running the job. We also need to pass README.md the argument at the second time (just after jar file). Then, we can use val filename = args(0) in our Main.scala to get the filename argument to process the file. Like this, it is a little bit flexible and we can load any other files to run with the program.