Build A React + Flask App with a react-vis to create a line chart for data visualization
January 06, 2021
This is the tutorial guide to create a React + Flask App with a react-vis package to create a line chart.
Prerequisites
- Linux OS
- Familiar with JavaScript
- Familiar with Python
- Familiar with React
- Node.js and Python 3 are installed
Reference
- Excellent tutorial: how to create a react + flask project
- react-vis tutorial: Your first chart
Overview
In this tutorial, we will first create a React project skeleton. Inside this React project, we will create a Flask API as a backend service to generate chart data for the front-end. Then we will test the backend endpoint. After that, we will create a single page chart with react-vis to display the line chart data from the Flask backend.
Create a React Project
We will first create a react app using the create-react-app generator.
$ npx create-react-app react-flask-app
$ cd react-flask-app
then open this project with Visual Studio Code. From now on, we will use Terminal from Visual Studio Code.
$ code .
Use Alt+F12 to view Terminal at Visual Studio Code.
Create a Flask API Backend
Create an API folder
We gonna create a flask API folder inside the React project.
$ mkdir api
$ cd api
Create a Virtual Environment
We will create a virtual environment for Python.
$ python3 -m venv venv
$ source venv/bin/activate
Once activated, (venv) will be appeared in front of the command line.
Install Python packages
We need to install the necessary python packages by doing so.
(venv) $ pip install flask python-dotenv
Create a Flask Environment File
Create a .flaskenv file to set environment variables automatically.
(venv) $ nano .flaskenv
Paste these lines, Ctrl+O to write and exit by pressing Ctrl+X
FLASK_APP=api.py
FLASK_ENV=development
Create a Flask Endpoint
Create an api.py file to creat our api endpoint.
(venv) $ nano api.py
Paste the following lines, Ctrl+O to write and exit by pressing Ctrl+X. The following code will generate a list of 10 points with random Y values. We need to use jsonify to convert the list to the JSON format.
from random import randrange

import flask as flask
from flask import jsonify

app = flask.Flask(__name__)


@app.route('/api/chart_data')
def getChartData():
array = list(map(lambda x: {'x': x, 'y': randrange(20)}, range(10)))
return jsonify(array)
Testing Flask Backend
We can start the Flask app by running
(venv) $ flask run
Open any browser and test http://localhost:5000/api/chart_data. You should be able to see JSON data from 0 to 9.
Create a React Frontend
Add a Proxy to connect with Flask App
We need to edit package.json at the React App folder to get data from the backend. Since our backend is running at http://localhost:5000, we need to map it to that address. Insert "proxy": "http://localhost:5000" at the end of the file.
This should look like this,
{
  "name": "react-flask-app",
  "version": "0.1.0",
  "private": true,
  "dependencies": {
    "@testing-library/jest-dom": "^5.11.4",
    "@testing-library/react": "^11.1.0",
    "@testing-library/user-event": "^12.1.10",
    "react": "^17.0.1",
    "react-dom": "^17.0.1",
    "react-scripts": "4.0.1",
    "web-vitals": "^0.2.4"
  },
  "scripts": {
    "start": "react-scripts start",
    "build": "react-scripts build",
    "test": "react-scripts test",
    "eject": "react-scripts eject"
  },
  "eslintConfig": {
    "extends": [
      "react-app",
      "react-app/jest"
    ]
  },
  "browserslist": {
    "production": [
      ">0.2%",
      "not dead",
      "not op_mini all"
    ],
    "development": [
      "last 1 chrome version",
      "last 1 firefox version",
      "last 1 safari version"
    ]
  },
  "proxy": "http://localhost:5000"
}
Install react-vis
Create a new Terminal from Visual Studio Code. At a new Terminal, type the following line to install react-vis via npm
$ npm install react-vis
Edit App.js
Now we need to replace code from App.js with the following code to display the chart. Here, we use useEffect to call the /api/chart_data API from the backend once the page is loaded.
import React, { useState, useEffect } from "react";
import {
  XYPlot,
  XAxis,
  YAxis,
  HorizontalGridLines,
  VerticalGridLines,
  LineSeries,
} from "react-vis";
import '../node_modules/react-vis/dist/style.css';

export default function Home() {
  const [currentChartData, setCurrentChartData] = useState([]);

  useEffect(() => {
    fetch("/api/chart_data")
      .then((res) => res.json())
      .then((data) => {
        console.log("chart data is", data);
        setCurrentChartData(data);
      });
  }, []);

  return (
    <div>
      <XYPlot xType="linear" width={300} height={300}>
        <HorizontalGridLines />
        <VerticalGridLines />
        <XAxis title="X Axis" />
        <YAxis title="Y Axis" />
        <LineSeries data={currentChartData} />
      </XYPlot>
    </div>
  );
}
Start React App
Now we will start the react app by typing the following line at Terminal.
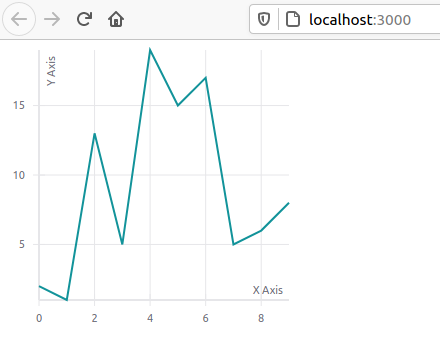
$ yarn start
Then observe the chart by opening this link http://localhost:3000 on any browser. Refresh the page to observe the random data chart.